
フロントエンドエンジニアから見たアジャイル開発
TECH
最終更新日:2022.12.23
更新日:2022.12.23

弊社では、2018年頃から「WebのサーバーサイドはAPIとして機能提供」スタイルが中心となってきました。
API開発ではページ組み込み系と比べ、データのIN/OUT設計をよりしっかりと行う必要があります。APIという事で、IN/OUTが剥き出し状態になるので、当然といえば当然です。
それほど重要なAPIのIN/OUT定義、仕様設計については、ドキュメント形式について色々と悶着がありました。
結果、弊社では「Swagger」(またはOpenAPI)をメイン仕様書として使うスタイルで落ち着いています。
Swaggerとはなんぞや?というお話については、割愛しますので、以下の詳しく紹介してくれている記事などをご参照ください
【連載】Swagger入門 – 初めてのAPI仕様管理講座 [1] Swaggerとは|開発ソフトウェア|IT製品の事例・解説記事
Swagger、本当に便利ですね!大変快適です。
Excelで管理しようとしていた時代から比べると開発がしやすくて仕方ありません。
とはいえ悪かったこともあります。Swaggerを仕様書のメインに据えてAPI開発を行って感じた、良かった・悪かったをまとめます。
良かったこと
悪かったこと
ファイルが巨大化する問題と、併行作業出来ない問題については、運用フローでカバーしようという試みも行いました。が、それでも問題点としてチームの議題にあがることが多々ありました。
そもそも1ファイルに対して、併行作業するなよって話ですが…。
チーム全体のSwagger理解を深めるためにも、特定の誰かがSwaggerをメンテナンスするというフローよりは、併行作業をしやすくする方向で解決方法がないか?を探しました。
結果「Swaggerファイルの分割をしてみよう」という結論になりました。
手段としては、いろいろツールがあります。
が、やるべきことはシンプルに以下2点です。
極論をいうと、複数のYAMLファイルから1枚のSwagger YAML形式のファイルをビルドできればなんでも良さそうです。 正直、作れる人はお手製のシェルでもなんでもいいと思います。
私は、参考にした記事をお手本に、以下のnpmライブラリを使って、YAMLから他のYAMLファイルを読み込むように設定しました。
このライブラリとgulpファイルを使い、変更を検知して自動ビルドを行うように設定します。
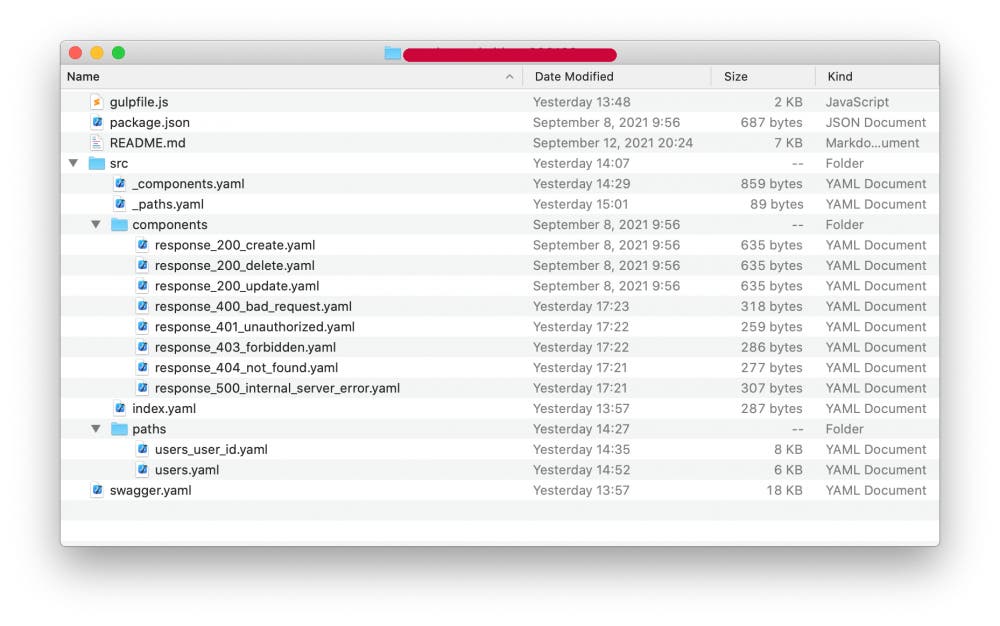
「/src」以下が、分割したファイル群で、ビルドされたSwaggerファイルがルートディレクトリに出力されるという構成です。
ビルド設定については、前述の通りgulpfile.jsに全て行います。
packege.json
|
1 2 3 4 5 6 7 8 9 10 11 12 13 14 15 16 17 18 19 20 21 22 23 |
{ "name": "test", "version": "1.0.0", "description": "test", "main": "resolve.js", "scripts": { "start": "gulp", "build": "gulp build", "start2": "node resolve.js ./src/index.yaml -o yaml > ./test.swagger.yaml", "test": "node resolve.js index.yaml > test/resolved.json && node resolve.js -o yaml index.yaml" }, "license": "MIT", "dependencies": { "commander": "^2.19.0", "gulp": "^4.0.2", "gulp-rename": "^2.0.0", "js-yaml": "^3.12.2", "json-refs": "^3.0.12", "multi-file-swagger": "^2.3.0", "through2": "^4.0.2" } } |
gulpfile.js
|
1 2 3 4 5 6 7 8 9 10 11 12 13 14 15 16 17 18 19 20 21 22 23 24 25 26 27 28 29 30 31 32 33 34 35 36 37 38 39 40 41 42 43 44 45 46 47 48 49 50 51 52 53 54 55 56 57 58 59 60 61 62 63 64 65 66 67 68 69 70 |
'use strict'; const fs = require('fs'); const gulp = require('gulp'); const path = require('path'); const rename = require('gulp-rename'); const through2 = require('through2'); const yaml = require('js-yaml'); // パスの設定 const entryPath = './src'; const outputFileName = 'swagger'; const outputPath = './'; gulp.task('compile', cb => { return gulp .src(`${entryPath}/index.yaml`) .pipe(through2.obj((file, enc, cb) => { if (!file.isBuffer()) throw new Error(`[FAILED]. '${entryPath}/index.yaml' can not load target file.`); const root = yaml.safeLoad(file.contents); // resolveパッケージを再読み込み const resolve = require('json-refs').resolveRefs; const options = { filter : ['relative', 'remote'], loaderOptions : { processContent : (res, callback) => { callback(null, yaml.safeLoad(res.text)); } } }; resolve(root, options).then((results) => { file.contents = Buffer.from(yaml.safeDump(results.resolved)); // gulpで実行すると読み込んだyamlがキャッシュされてそうだったのでモジュールキャッシュを削除 <- いらないかも delete require.cache[require.resolve('json-refs')]; cb(null, file); }).catch((e) => { throw new Error(e); }); }) ) .pipe(rename({ basename: outputFileName, extname: '.yaml' })) .pipe(gulp.dest(outputPath)); }); gulp.task('watch', cb => { gulp.watch( [ entryPath + '/**/*.yaml' ], gulp.task('compile') ); }); gulp.task( 'default', gulp.series( 'compile', gulp.parallel('watch') ) ); gulp.task( 'build', gulp.series( 'compile' ) ); |
index.yaml
|
1 2 3 4 5 6 7 8 9 10 11 12 13 14 15 16 |
openapi: 3.0.1 info: title: EXAMPLE API description: EXAMPLE API 定義書 version: 1.0.0 tags: - name: user description: ユーザーデータの操作を行うエンドポイント用のタグ paths: $ref: ./src/_paths.yaml components: $ref: ./src/_components.yaml |
_paths.yaml
|
1 2 3 4 5 |
/users: $ref: ./paths/users.yaml /users/{userId}: $ref: ./paths/users_user_id.yaml |
_components.yaml
|
1 2 3 4 5 6 7 8 9 10 11 12 13 14 15 16 17 18 |
securitySchemes: apiKey: type: apiKey name: x-api-key in: header description: API秘密鍵 schemas: ResponseBadRequest: $ref: ./components/response_400_bad_request.yaml ResponseUnauthorized: $ref: ./components/response_401_unauthorized.yaml ResponseForbidden: $ref: ./components/response_403_forbidden.yaml ResponseNotFound: $ref: ./components/response_404_not_found.yaml ResponseInternalServerError: $ref: ./components/response_500_internal_server_error.yaml |
paths以下のファイルは、エンドポイントのスキーマ定義を別ファイル化しただけの内容です。こんなざっくりしたAPIのエンドポイントはありえない話ですが、サンプルということで。
/paths/*.yaml
|
1 2 3 4 5 6 7 8 9 10 11 12 13 14 15 16 17 18 19 20 21 22 23 24 25 26 27 28 29 30 31 32 33 34 35 36 37 38 39 40 41 42 43 44 45 46 47 48 49 50 51 52 53 54 55 56 57 58 59 60 61 62 63 64 65 66 67 68 69 70 71 72 73 74 75 76 77 78 79 80 81 82 83 84 85 86 87 88 89 90 91 92 93 94 95 96 |
get: tags: - user summary: 一覧取得 | ユーザーの一覧取得 description: ユーザーの一覧取得 operationId: searchUser parameters: - name: x-api-key in: header description: 'APIシークレットキー' required: true schema: type: string example: "aX!bZ-7p_Q.i3hGB8puG+Y.PAjs.|*MU" responses: 200: description: | 詳細情報取得に成功した時 ※ パスワードの項目は出力項目から除外する事 content: application/json: schema: type: object properties: items: type: object properties: id: description: ユーザーID type: string name: description: ユーザー名 type: string mailAddress: type: string description: ユーザーメールアドレス createdAt: description: 登録時間 type: string updatedAt: description: 更新時間 type: string example: - id: "351" name: "山田 太郎" mailAddress: "test@example.com" createdAt: "2021-01-01T00:00:00Z" updatedAt: "2021-01-31T00:00:00Z" - id: "352" name: "月極 太郎" mailAddress: "test3@example.com" createdAt: "2021-01-01T00:00:00Z" updatedAt: "2021-01-31T00:00:00Z" - id: "353" name: "月極 花子" mailAddress: "test5@example.com" createdAt: "2021-01-01T00:00:00Z" updatedAt: "2021-01-31T00:00:00Z" 400: description: パラメーター検証に失敗しました content: application/json: schema: $ref: '#/components/schemas/ResponseBadRequest' 401: description: 認証処理に失敗しました content: application/json: schema: $ref: '#/components/schemas/ResponseUnauthorized' 403: description: 指定リソースへのアクセス権限がありません content: application/json: schema: $ref: '#/components/schemas/ResponseForbidden' 404: description: 指定リソースは存在しません content: application/json: schema: $ref: '#/components/schemas/ResponseNotFound' 500: description: 予期せぬサーバーエラーが発生しました content: application/json: schema: $ref: '#/components/schemas/ResponseInternalServerError' security: - apiKey: [] |
components以下のファイルについては、共通レスポンスの定義部分を別ファイル化しているだけの内用です。こんなにざっくりしたレスポンスはありえないですが、サンプルということで。
|
1 2 3 4 5 6 7 8 9 10 11 |
description: "404 Not found | 指定リソースがない時のレスポンス" type: object properties: errors: type: array items: type: object properties: message: type: string example: "コンテンツが存在しません" |
パッケージ直下で、以下のコマンドを実行すれば、src以下の変更を検知してSwaggerファイルを自動ビルドします。
yarnを使っている場合
|
1 2 |
yarn install yarn start |
ここまでの設定で、Swaggerファイルは自動ビルドされるようになりましたが、出来上がったSwaggerファイルの確認が少し面倒くさいため、 DockerでSwaggerUIが起動する様に設定します。
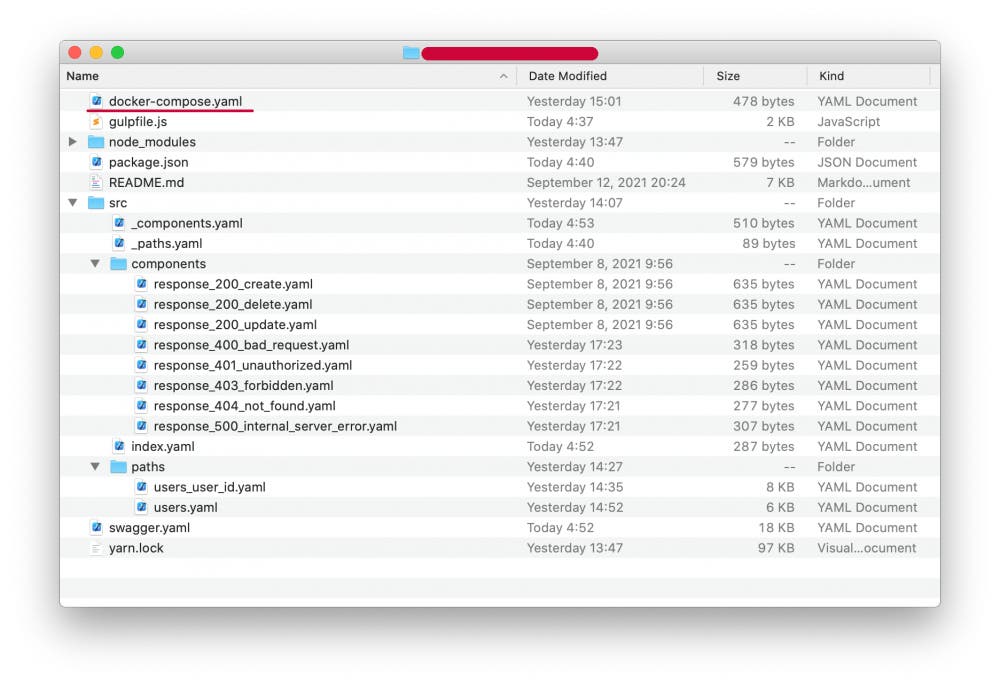
docker-compose.yamlを追加。
SwaggerUIの設定を行います。
|
1 2 3 4 5 6 7 8 9 10 11 12 |
version: '3.3' services: test-swagger-ui: image: swaggerapi/swagger-ui container_name: test-swagger-ui ports: - "50000:8080" volumes: - ./swagger.yaml:/usr/share/nginx/html/swagger.yaml environment: API_URL: ./swagger.yaml |
作成したdocker-composeファイルを使用して、以下コマンドを実行
docker-compose up
ブラウザで「http://localhost:50000」を開くと作成したSwaggerファイルの確認が可能になります。
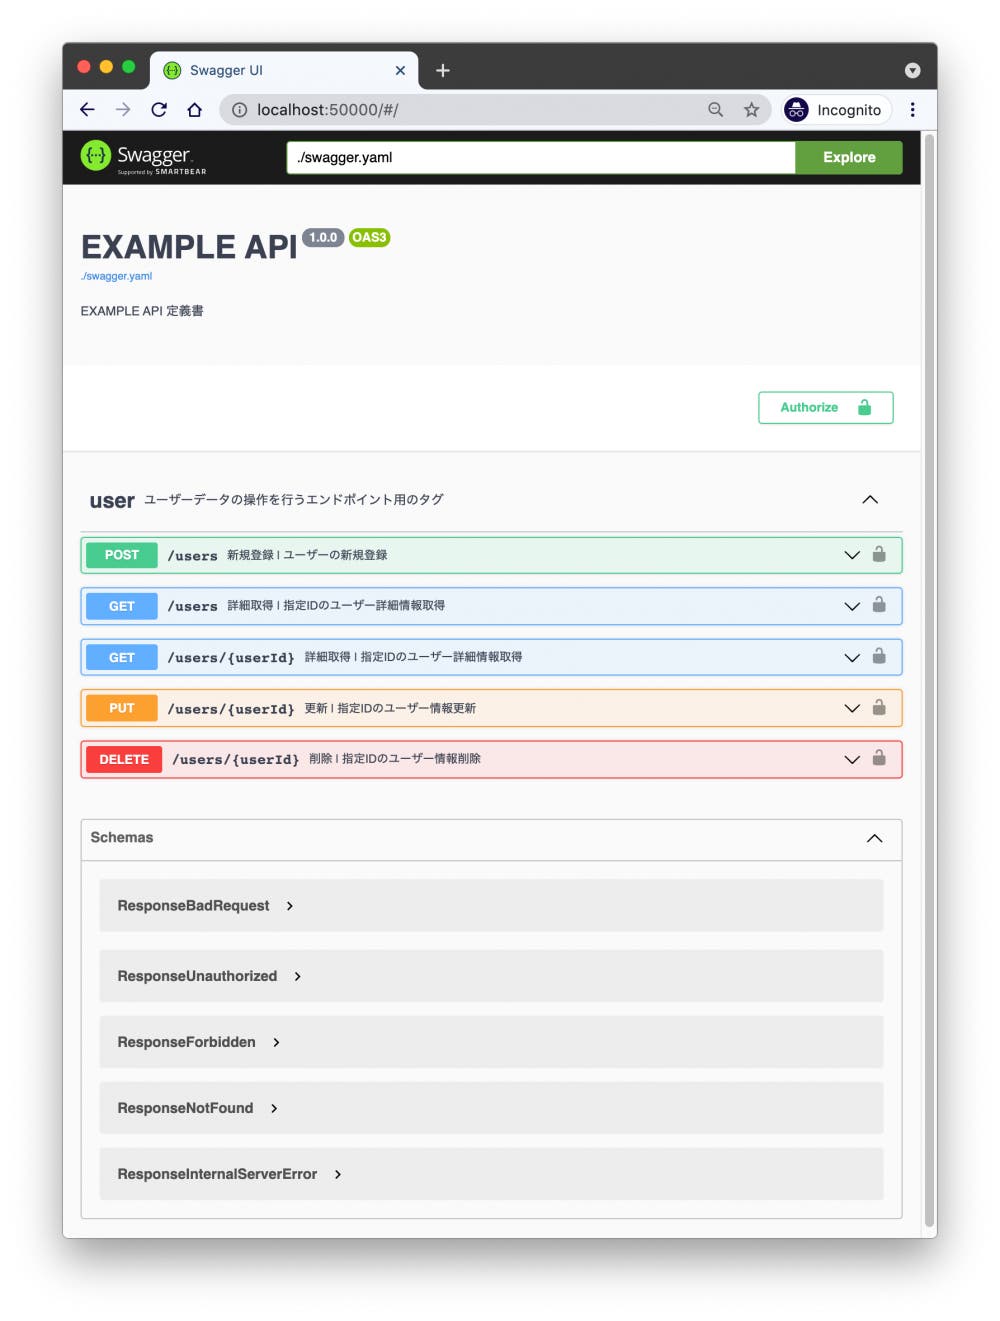
Swaggerの更新と連動したモックAPIサーバーも設定します。 docker-composeファイルを以下の内容に更新
|
1 2 3 4 5 6 7 8 9 10 11 12 13 14 15 16 17 18 19 20 21 22 |
version: '3.3' services: test-swagger-ui: image: swaggerapi/swagger-ui container_name: test-swagger-ui ports: - "50000:8080" volumes: - ./swagger.yaml:/usr/share/nginx/html/swagger.yaml environment: API_URL: ./swagger.yaml # モックサーバー設定 test-swagger-api: image: stoplight/prism:4 container_name: 'test-swagger-api' ports: - "50001:4010" command: mock -h 0.0.0.0 /swagger.yaml volumes: - ./swagger.yaml:/swagger.yaml |
以下、コマンドを実行
|
1 2 |
docker-compose down docker-compose up |
「http://localhost:50001」で、Swaggerファイルで定義したAPIエンドポイントのモックサーバーが起動します。
PostmanなどHTTPクライアントでAPIをテスト。
エンドポイントの定義を記述した/usersに対して、GETリクエストを実行します。
Swaggerに記述したexampleの内容でレスポンスが返ってくることを確認。
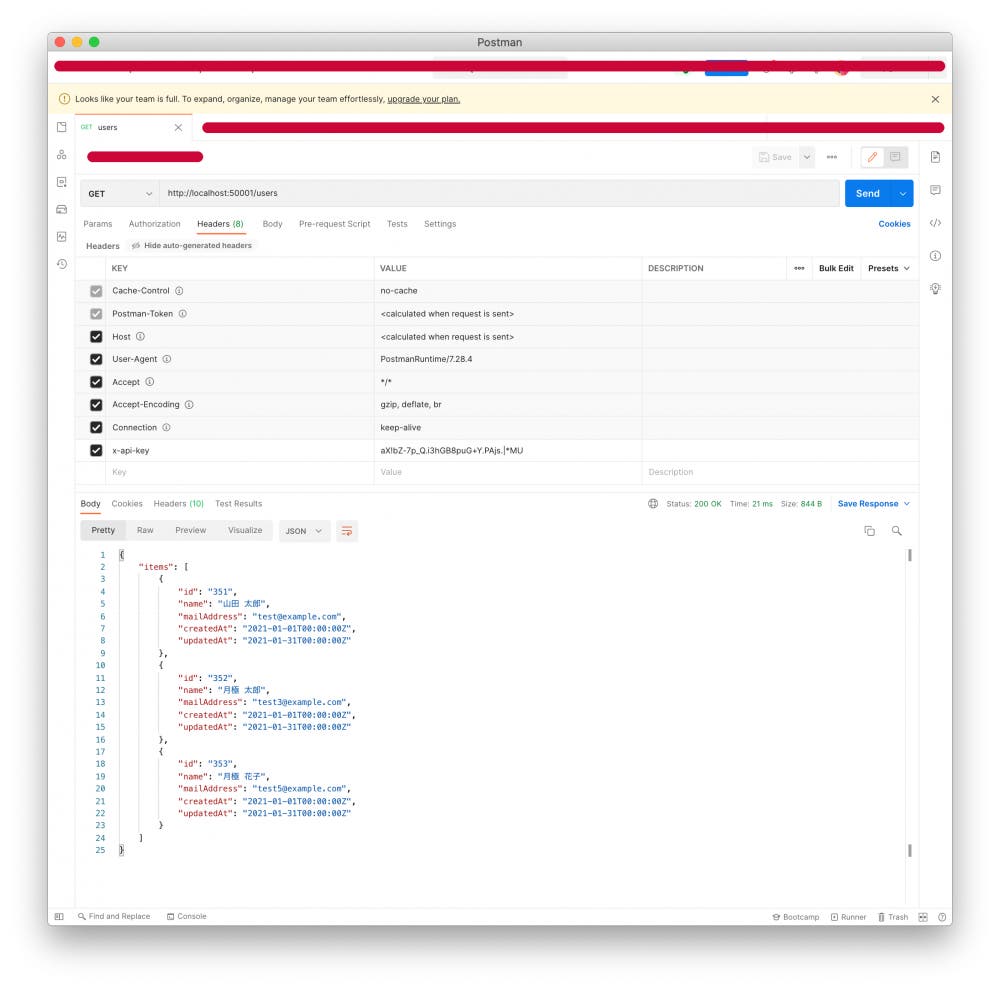
x-api-keyで、クライアントとAPIサーバーの認証を行うという想定なので、x-api-keyが送信されなかった時、リクエストエラーになる事を確認。
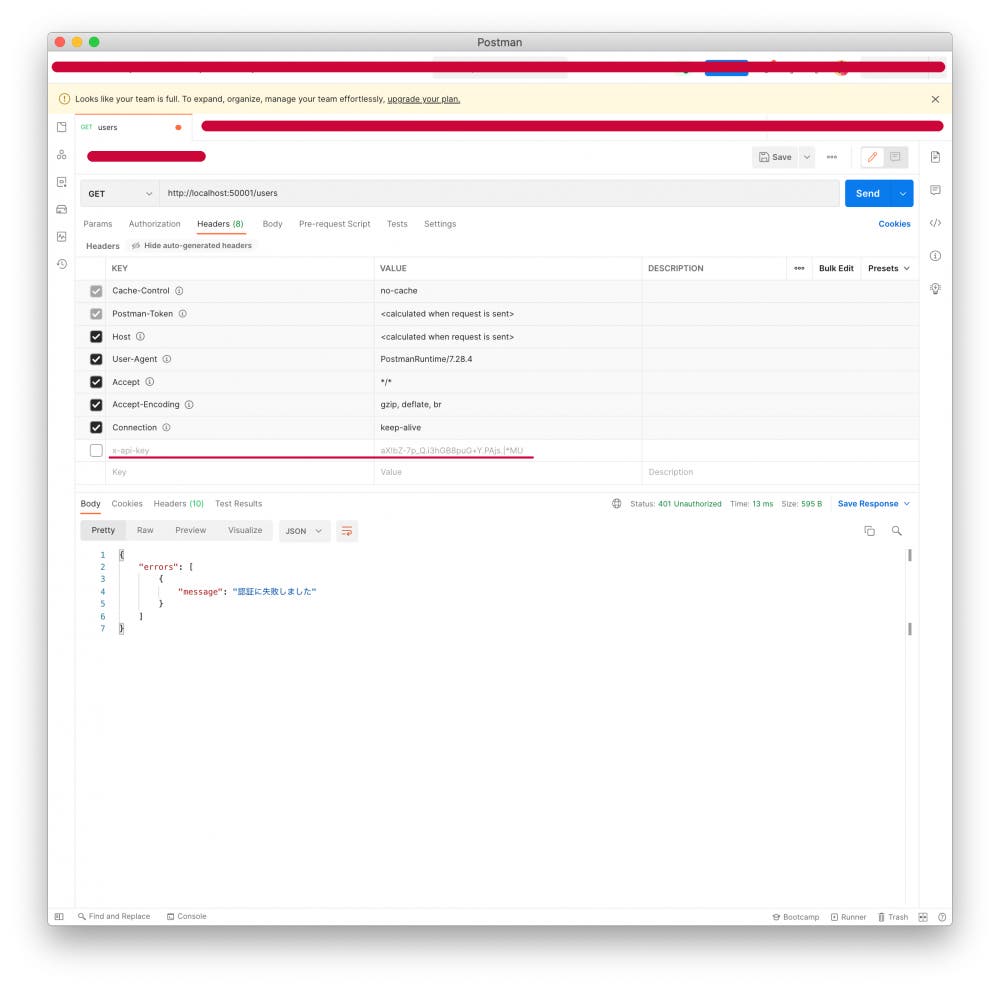
ここまでで、一通りのSwagger周りの環境設定が完了しました。
Swagger更新 › ブラウザで確認 › お好みでモックAPIを使用してAPIを実装
という一連のAPI開発サイクルが可能になると思います。
また、ファイルを分割した事により、複数人によるSwaggerの編集作業も少しはしやすくなると思います。
とはいえ、Swaggerを分割してもコンフリクトは発生します。
主なコンフリクト発生ポイントは以下となります。
所感としては、コンフリクトが起きはするものの、ファイルを分割したことによりコンフリクト解消の負担はかなり軽減出来ていると思います。
Swaggerファイルを分割して、気付いたデメリットは以下です。
対策としては、編集完了後に必ずブラウザ版のSwaggerEditorを開き、 ビルドしたSwaggerを貼り付けて最終チェックを行うというフローで解決は出来ます。設定で解決は出来そうですが、ひとまず今はこの運用をしています。
Swaggerを分割することでSwaggerのメンテナンスが苦痛ではなくなりました。特にエンドポイントをファイル単位で管理できる所が非常に◎でした。
多少の面倒くささは残りますが、10,000行を超えるSwaggerファイルのコンフリクトを直していた時の事を考えると…って感じです。
私は、この状態で過不足ないので、これ以上の工夫はしていません。
が、今ならもっとSwaggerのメンテナンスをお手軽にしてくれる設定などがあると思います。
Swaggerのメンテナンスで苦労をされている方は、Swaggerの分割、もしくはその他の方法を模索してみてはいかがでしょうか?